
YouTube is the second-largest search engine in the world, with 1.8 billion users logging in every month. These Best Tools for creating YouTube Videos, you can reach a massive audience, engage with a global community, and create content that can be accessed by anyone, anywhere. But make sure you have Best Tools for creating YouTube Videos.
YouTube is a great way to make money. There are several different ways to monetize your channel, including advertisements, sponsored content, affiliate marketing, and merchandise sales. Plus, the more views and subscribers you have, the more money you can make.
With so many benefits to look for, one must make sure you have the Best Tools for creating YouTube Videos. There are a few essential accessories that you need to make sure you have before you start shooting.
Here are the Best Tools for creating YouTube Videos.
Table of Contents
A. Video Shooting Setup
1. Camera:
A camera is the most important accessory you’ll need to create great videos. Whether you’re a beginner or a pro, you can find a camera that works for your needs and budget.
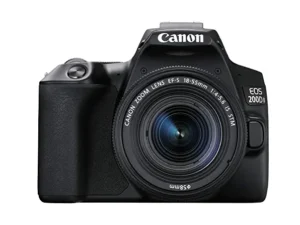
Professional Youtubers use high quality, professional cameras for shooting videos. Some of the most popular cameras used by YouTubers in India include the Canon EOS 80D, Sony Alpha a6400, Nikon D5600, Canon EOS M50, and Panasonic Lumix GH5. Other popular options include the Canon EOS 90D, Sony Alpha a7 III, Nikon Z6, Sony Alpha a7S II, and Sony Alpha a6500.
While amongst Beginners, smartphone are the most commonly used device to shoot videos by for vlogging, shooting reel videos etc. But one must understand that, while smartphones are more than capable of capturing high-quality video, you’ll need to know how to adjust your camera settings to get the most out of it.
Some of the features to look for are, Image stabilization, Manual settings, and HD resolution. This is probably the most important accessory for making YouTube videos. You will need a camera that can capture quality video footage. There are a variety of cameras available, but you will want to make sure you get one with at least 1080p resolution and the ability to adjust settings like exposure and white balance.
Here are some tips to help you shoot a professional YouTube video with your smartphone camera.
- Set the ISO: Choose a low ISO setting, such as 100 or 200, to reduce noise in your video.
- Set White Balance: Set the white balance to match the lighting in your scene for accurate colors.
- Set the Aperture: Use a wide aperture, such as f/2.8 or lower, to blur the background and draw attention to the subject.
- Set the Shutter Speed: Use a fast shutter speed, such as 1/50 or 1/100, to reduce motion blur.
- Enable Image Stabilization: Turn on image stabilization to reduce camera shake.
- Use Manual Focus: Use manual focus to ensure the camera is focused on the subject.
- Set the Frame Rate: Choose a frame rate that matches your desired video quality, such as 24 fps for cinematic quality or 30 fps for a more fluid look.
2. Tripod:

A tripod will help keep your camera stable, so you can film without worrying about shaky footage. Look for one that’s adjustable and has a quick-release plate, so you can switch between shots quickly. A tripod will help you keep your camera steady while recording and will also help you keep your shots in focus. You can find tripods of all sizes, so make sure to get one that fits your camera and is easy to transport.
Features you should look for :
- Adjustable Height: Look for a tripod that has adjustable height range, so you can adjust it to the right height.
- Quick-Release Plate: To help you to quickly attach and detach your camera from the tripod.
- Maximum Load Capacity: Make sure the tripod can handle the weight of your camera and other equipment.
- Sturdy Design: A sturdy design that can handle the vibrations of shooting videos.
- Lightweight: Lightweight tripod are easy to carry around.
- Three-Way Pan Head: So you can easily adjust the angle of your camera shots.
- Leg Locks: So you can easily adjust the height of the tripod.
- Bubble Level: So you can easily make sure your camera is level with ground.
- Head Tilt: So you can adjust the tilt of your camera shots for incline planes.
- Extra Accessories: Such as carrying cases or extra quick-release plates etc are always helpful.
Beginners, here are some tried and tested, suitable for Smartphone and Camera, Tripods under 1000rs on Amazon. Click the link to check latest price.
B. Audio Recording Setup
1. Microphone:
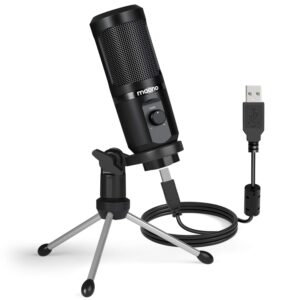
A good informative video becomes, the best one with good voice texture. Specially when you are trying to communicate some good ideas, some valuable information and want viewers to keep A good microphone is essential for making your videos sound clear and professional. Look for features like noise cancellation and directional microphones for best results. Audio is just as important as video when it comes to making YouTube videos. You will need a microphone that can capture good quality sound. You can find both wired and wireless microphones, so make sure to think about what type of setup you need.
Features to look for:
- High Sensitivity: Look for a microphone with a high sensitivity rating, so that it can pick up even the softest notes and sounds.
- Directional Pickup Pattern: It’s important to find a microphone with a directional pickup pattern, like a cardioid or supercardioid. This will ensure that the microphone only picks up sound from the direction it is pointed and not from the sides or back.
- Low Noise Floor: Look for a microphone with a low noise floor, which will help to reduce background noise and distortion.
- Frequency Response: Make sure to check the frequency response of the microphone. A wider frequency range means that the microphone is able to capture more of the nuances of your voice.
- Shock Mount: Shock mounts help to reduce vibration coming from the floor or other surfaces, which can cause noise and distortion.
- Windscreen: A windscreen can help reduce wind noise and plosives from your voice.
- Plug-and-Play Compatibility: Look for a microphone that is compatible with your computer or recording device, so that you don’t have to go through the hassle of downloading drivers or setting up connections.
Here are some of the best (4.0 and up rating on Amazon) Microphones you can try:
Read the detailed Blog i have written on Best Microphones in 2023 and how to select.
C. Lighting Setup
1. Lighting:
Good lighting helps your videos look crisp and professional. With better lighting setup one can save time on Video editing software to make your videos more professional or Cinematic later. With right position of light, right temperature control, brightness control and slight camera setting to adjust one can make normal video, to professional one.
Features to look for while selecting lighting type:
- Color Temperature: Look for lighting that offers adjustable color temperature to match the conditions of the camera and the environment. This will help you achieve a more natural look in your video.
- Brightness: Make sure to select lighting that has enough brightness for your needs. If you are filming in a dark environment, you will need extra bright lighting to ensure that the video looks good.
- Directional Lighting: Look for lighting that provides directional lighting so you can control the look of your video. This will help you create a more professional look.
- Diffusion: Make sure your lighting has diffusion options so you can soften the light and avoid harsh shadows. This will help make your video look more natural and pleasing.
- Versatility: Select lighting that can be used in multiple ways. For example, if you want to use lighting for both indoor and outdoor shoots, make sure you select one that is versatile enough to meet your needs.
Some of the types of Lighting used are:
- Softbox Lighting
- Continuous Lighting
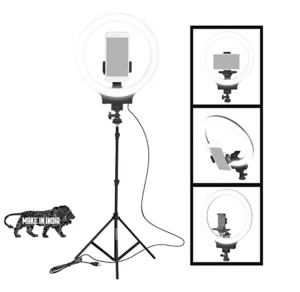
- Ring Lighting
- Spot Lights
- Window Lighting
- LED Lighting
- Umbrella Lighting .. etc
Here are some Most Preferred Lighting used by Youtubers, Beginners to Professionals. Click the link to check the latest price.
D. Editing Software:
Once you’ve filmed your video, you’ll need to edit it. Look for software that’s easy to use and offers features like color correction and sound effects. Once you have all your footage, you will need to edit it for Intro , Outro, thumbnails etc. There are a variety of video editing software programs available, so make sure to find one that is easy to use and has the features you need.
Some of the Best Video Editing Software are :
- Adobe Premiere Pro used by Professionals on PC.
- Final Cut Pro X
- Adobe After Effects
- Corel VideoStudio Pro
- Inshot and VN apps are most preferred for Mobile Editting.
Some of the Best Audio Editing Software are :
- Adobe Audition
- Sony Sound Forge
- FL Studio
- Cubase
- Audacity one of the most preferred software for PC.
- Lexis audio editor is one good option for Mobile editing.
E. Storage:
You’ll need a place to store all your video files. Look for an external hard drive that’s large enough to store your videos and has quick transfer speeds.
When shooting video for YouTube, there are several important settings to consider to keep file size optimum with best quality.
- Resolution: YouTube supports up to 8K resolution, so if you have access to a camera capable of shooting in 8K, you should take advantage of that. Otherwise, 1080p should be the minimum resolution you shoot in.
- Frame rate: YouTube supports up to 60fps, but if you’re shooting content that doesn’t require the extra frames, you should stick with the standard 24fps. This will help keep your file sizes down and make it easier to upload your video to YouTube.
- Video codec: YouTube recommends using the H.264 video codec for the best quality and compatibility.
- Audio codec: YouTube recommends using the AAC audio codec for the best quality and compatibility.
- Bit rate: YouTube recommends using a bit rate of 8-10mbps for 1080p resolution, and 12-15mbps for 4K resolution.
But wait..!! That`s not it..!! You might need some of these items too as per your Niche video’s, to create more depth in your videos. Now, here are some:
F. Accessories for Video Shooting
- Green Screen: If you have small room or shoot at location where there’s disturbance in background Green screen can be helpful. With good video editing software you can add good background as you wish.
- Teleprompter: A teleprompter can be useful for video shooting by allowing you to deliver your lines without having to memorize them. It also helps you to keep your eyes on the camera. Additionally, a teleprompter can help to keep you on track and on schedule.
- Background Music: You can use good background music to give mood to video, or information you intent to give the audience, to keep them engaged till end of video. you can download Royalt Free Music from Pixabay
These are The Best Tools for creating YouTube Videos, some basic accessories you need to make YouTube videos. Of course, you can always add more accessories to your setup if you want to take your videos to the next level as per your budget, need. However, these basics should get you started. Good luck!
Always keep in mind “Why You started YT Channel” so that you keep justifying your efforts in proper and faithful way for your audience. Second most important thing is to Enjoy what you do. This way your audience will genuinely will follow you and keep watching your videos.
Have a wonderful Youtubing !!
Check out our other blogs on
If you like this Blog do share with those you think it can be helpful to. Your view and comments on these blogs are always welcome. Do help us to improve if you can suggest something.
Also you can Read Following Blogs to gain More Knowledge on :-
- WHAT IS “AFFILIATE MARKETING” ?
- 5 MAIN TYPES OF AFFILIATE MARKETING
- Best Affiliate Programs in India 2023
Do Follow us on
Keep Learning, keep growing.
Take care.
Affiliate Marketing Disclaimer : This blog post may contain affiliate links. This means that if you click on a link and make a purchase, I may receive a small commission at no additional cost to you. Please note that I only recommend products or services that I personally use and believe will add value to my readers. I am a participant in the Amazon Services LLC Associates Program, an affiliate advertising program designed to provide a means for me to earn fees by linking to Amazon.com and affiliated sites. Thank you for supporting my blog and helping me to continue creating valuable content for you.


2 Comments